Node- Socket
in Javascript
참고
[1] https://socket.io/docs/v4
Introduction
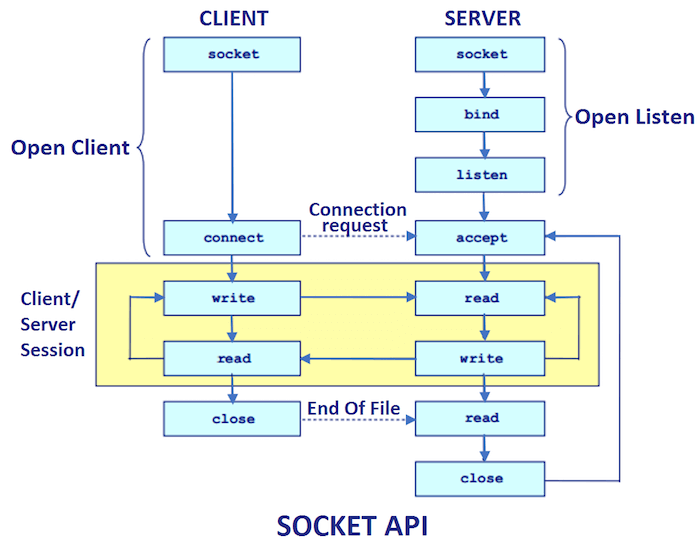
- 네트워크 상에서 정보를 주고 받는 방법(protocol)중 HTTP는 client에서 server로만 요청을 보낼 수 있는 단방향 통신이다. 하지만 실시간 채팅처럼 server에서 client에게 데이터를 전송해야하는 문제도 있다. 기존에는 HTTP protocol은 유지한 채로 Poling 기법을 취했다.
- Poling 기법은 HTTP protocol 상에서 client가 주기적으로 server에게 어떠한 변화가 있는지 체크하는 요청을 보내는 것이다. 주기적으로 확인 요청을 보내야하기 때문에 네트워크 상의 자원을 많이 차지하고 server에서 통신하는 client가 많아지면 server는 수 많은 확인 요청으로 인해 병목현상이 심화될 것이다.
- Socket protocol은 HTTP protocol과 달리 양방향으로 통신할 수 있는 protocol이다.
- Socket protocol은 server와 client간에 connection을 통해 양방향 통신을 가능하게 한다.
- Socket protocol상에서 server와 client간에 connection에 따라 TCP, UDP 등으로 나뉜다.
- connection은 항상 client에서 server로 연결 요청을 보낸다.
socket.io
- socket.io는 node에서 socket을 편리하게 사용할 수 있게 하는 패키지이다.
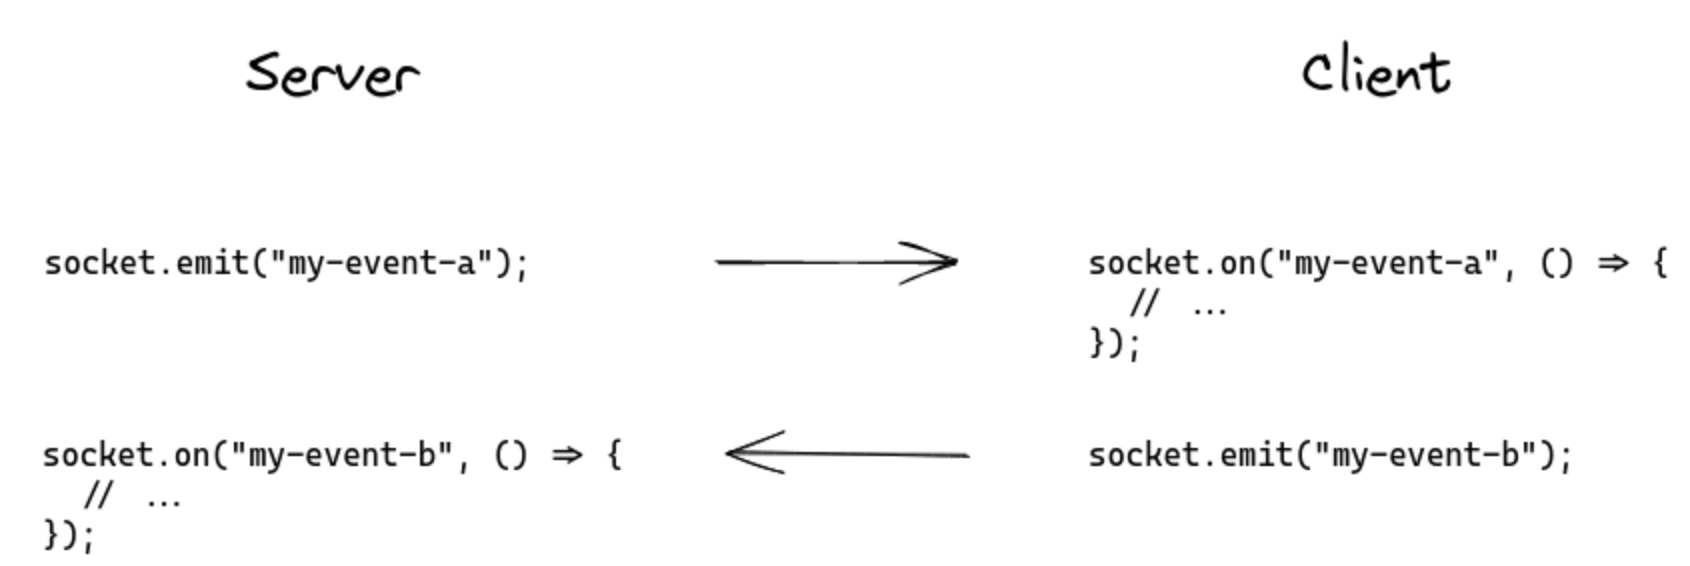
- nodejs에서 socket은 이벤트를 통해 데이터를 주고 받는다.
- socket.io 패키지를 이용하면 HTTP server와 연동하여 사용할 수 있다. 즉, HTTP server를 통해 socket server를 구축할 수 있다. 그렇기에 socket 연결 요청도 HTTP server로 요청해야 한다.
- 아래의 코드에서 http_server 객체는 app.listen()의 output으로 http server에 대한 정보들이 저장되어 있다.
const SocketIO = require('socket.io');
const io = SocketIO(http_server, { path: '/socket.io' }); // socket server를 http server에 connection. 동일한 port 번호 사용
io.on('connection', (socket) => {}); // connection이 완료되면 callback 함수가 실행된다.
io 객체
- server의 socket에는 계층 구조가 있는데, 첫번째로 나눠지는 것을 namespace라고 부른다.
- client는 해당 socket server의 namespace로 connection 요청을 보내야 한다.
const socket1 = io.of('/socket1');
const socket2 = io.of('/socket2');

socket1.on('connection', (socket) => {}); // 클라이언트는 /socket1 으로 connection 요청을 보내야만 한다.
socket2.on('connection', (socket) => {}); // 클라이언트는 /socket2 으로 connection 요청을 보내야만 한다.
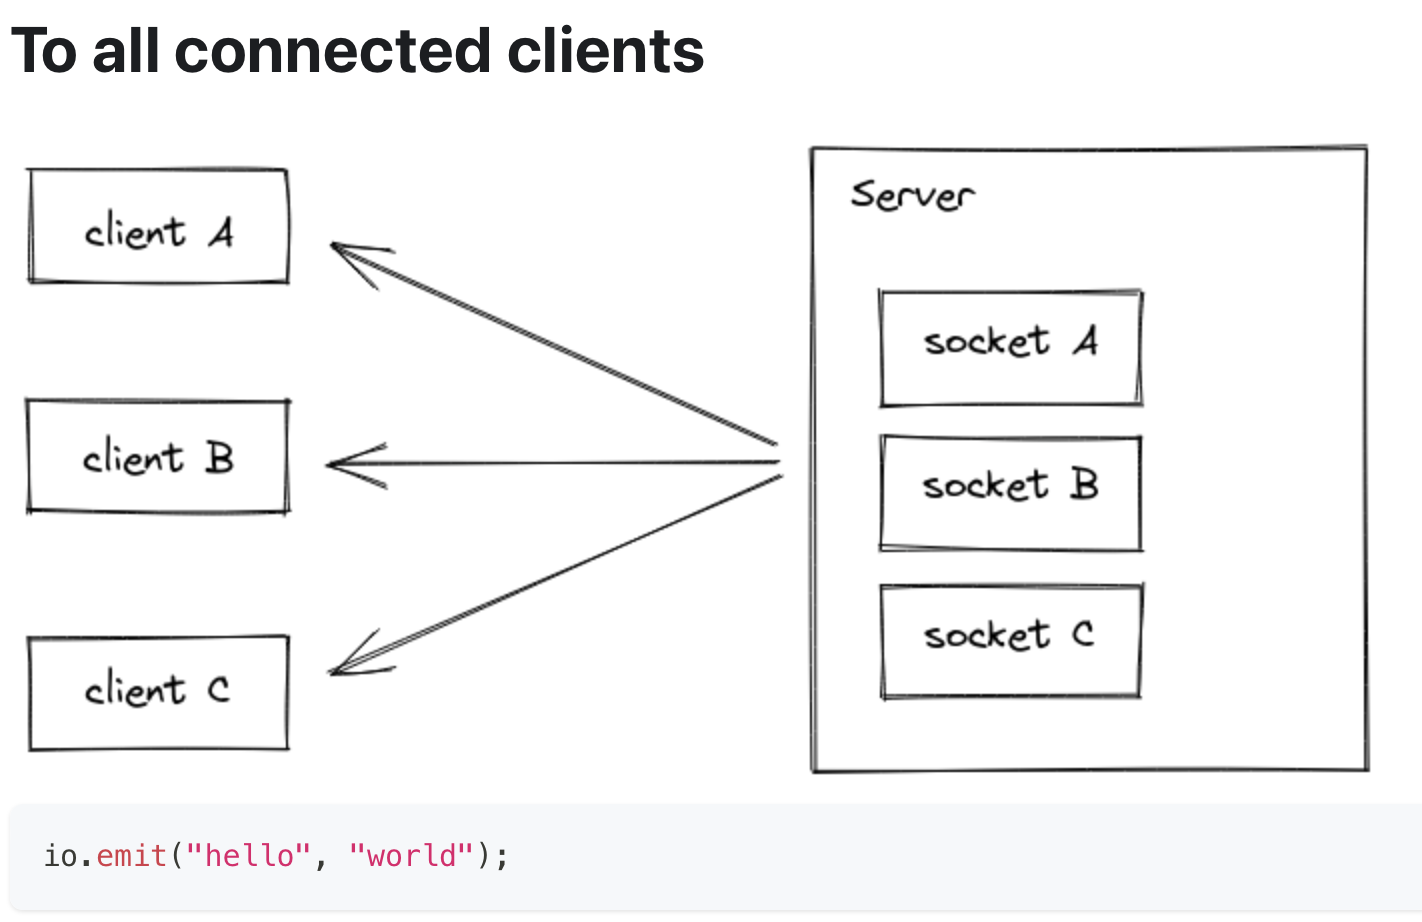
- io.emit 메소드를 통해 현재 server에 있는 모든 socket에서 데이터를 전송할 수 있다.
- client와 server간의 connection은 요청과 응답의 http protocol 상에서 이뤄지기 때문에 socket server에서도 middle-ware를 넣을 수 있고, connection 당시에만 실행된다.
io.on('connection', (socket) => {
    io.use((socket, next) => {
        if (isValid(socket.request)) {
            next();
        } else {
            next(new Error("invalid"));
        }
    });
});
- io.socketsJoin 메소드를 통해 현재 socket server 내부에 있는 socket의 room 위치를 변경할 수 있다.
// 현재 socket server 내부에 있는 모든 socket들을 "room1"으로 옮긴다.
io.socketsJoin("room1");

// "room1"에 위치한 모든 socket을 'room2'와 'room3'로 옮긴다.
io.in("room1").socketsJoin(["room2", "room3"]);

// "admin" namespace를 사용하고 "room1"에 위치한 모든 socket을 "room2"로 옮긴다.
io.of("/admin").in("room1").socketsJoin("room2");

// 특정 socket id의 socket을 'room1'으로 옮긴다.
io.in(theSocketId).socketsJoin("room1");
- io.socketsLeave 메소드를 통해 socket이 room을 떠나게 할 수 있다.
// make all Socket instances leave the "room1" room
io.socketsLeave("room1");

// make all Socket instances in the "room1" room leave the "room2" and "room3" rooms
io.in("room1").socketsLeave(["room2", "room3"]);

// make all Socket instances in the "room1" room of the "admin" namespace leave the "room2" room
io.of("/admin").in("room1").socketsLeave("room2");

// this also works with a single socket ID
io.in(theSocketId).socketsLeave("room1");
- io.disconnectSockets 메소드를 통해 socket의 연결을 끊을 수 있다. 특정 room만 연결을 끊는 socketsLeave와는 차이가 있다.
// make all Socket instances disconnect
io.disconnectSockets();

// make all Socket instances in the "room1" room disconnect (and discard the low-level connection)
io.in("room1").disconnectSockets(true);

// make all Socket instances in the "room1" room of the "admin" namespace disconnect
io.of("/admin").in("room1").disconnectSockets();

// this also works with a single socket ID
io.of("/admin").in(theSocketId).disconnectSockets();
- io.fetchSockets 메소드를 통해 특정 socket들을 검색할 수 있다. 리스트형태로 출력이 되니 for문을 이용하여 사용하자.
// return all Socket instances of the main namespace
const sockets = await io.fetchSockets();

// return all Socket instances in the "room1" room of the main namespace
const sockets = await io.in("room1").fetchSockets();

// return all Socket instances in the "room1" room of the "admin" namespace
const sockets = await io.of("/admin").in("room1").fetchSockets();

// this also works with a single socket ID
const sockets = await io.in(theSocketId).fetchSockets();

for (const socket of sockets) {
    console.log(socket.id);
    console.log(socket.handshake);
    console.log(socket.rooms);
    console.log(socket.data);
    socket.emit(/* ... */);
    socket.join(/* ... */);
    socket.leave(/* ... */);
    socket.disconnect(/* ... */);
}
socket 객체
- socket 객체는 connection이 성공적으로 이루어지면 그 콜백 함수의 parameter로 들어간다.
- socket protocol은 이벤트기반으로 데이터를 주고 받기에 socket 객체의 emit 메소드를 이용하여 이벤트를 발생시키고, on 메소드를 이용하여 이벤트를 받는다.
- 모든 socket은 room을 가지고 있다. room이란 namespace의 하위 구조라고 볼 수 있으며, 하나의 socket이 여러 room에 속할 수 있고, 하나의 room에 여러 socket이 들어있을 수 있다.
- 이벤트의 emit과 on은 room을 기준으로 하기에 해당 room에 속한 모든 socket에서 이벤트를 동일시 한다.
- 현재 자기 자신이 속하고 있는 room 외에도 다른 room에 속한 socket을 통해 데이터를 전송할 수 있다.
io.on("connection", (socket) => {
    console.log(socket.rooms); // Set { <socket.id> }
    socket.join(roomId1);
    socket.join(roomId2);
    console.log(socket.rooms); // Set { <socket.id>, roomId1, roomId2 }

    socket.emit({ data: "hello" }); // roomId1과 roomId2에 있는 모든 socket에게 데이터를 전송한다.
    socket.to(roomId1).emit({ data: "hello" }); // roomId1에 있는 모든 socket에게 데이터를 전송한다.
    socket.to(roomId3).emit({ data: "hello" }); // roomId3에 있는 모든 socket에게 데이터를 전송한다.
    /* ... */
    socket.on('disconnect', () => {
        socket.leave(roomId1);
        socket.leave(roomId2);
    })
});
- 모든 socket은 고유의 id를 가지고 있으며, server와 client에 동일한 id를 가진다. socket이 생성되면 default로 자기 id의 room에 들어간다.
io.on("connection", (socket) => {
  console.log(socket.id); // ojIckSD2jqNzOqIrAGzL
});

// client-side
socket.on("connect", () => {
  console.log(socket.id); // ojIckSD2jqNzOqIrAGzL
});

io.on("connection", socket => {
    socket.to(anotherSocketId).emit("private message", socket.id, msg); // anotherSocketId에 해당하는 socket에게만 메시지를 보낸다.
});
- server와 client가 connection 과정에서의 정보들도 담겨 있다. (hand-shake)
{
  headers: /* the headers of the initial request */
  query: /* the query params of the initial request */
  auth: /* the authentication payload */
  time: /* the date of creation (as string) */
  issued: /* the date of creation (unix timestamp) */
  url: /* the request URL string */
  address: /* the ip of the client */
  xdomain: /* whether the connection is cross-domain */
  secure: /* whether the connection is secure */
}
- socket.data 객체에 정보를 저장하면 io에서 fetchSocket을 통해 socket을 가져왔을 때, 데이터를 전달할 수 있다.
// server A
io.on("connection", (socket) => {
  socket.data.username = "alice";
});

// server B
const sockets = await io.fetchSockets();
console.log(sockets[0].data.username); // "alice"